10 Activities Using Contact Paper + Glitter Pom Poms
Let me tell you about the two items I keep buying over and over again. Not because they run out fast — but because every single time I set them up, my kids are completely occupied for at least an hour. Sometimes two.
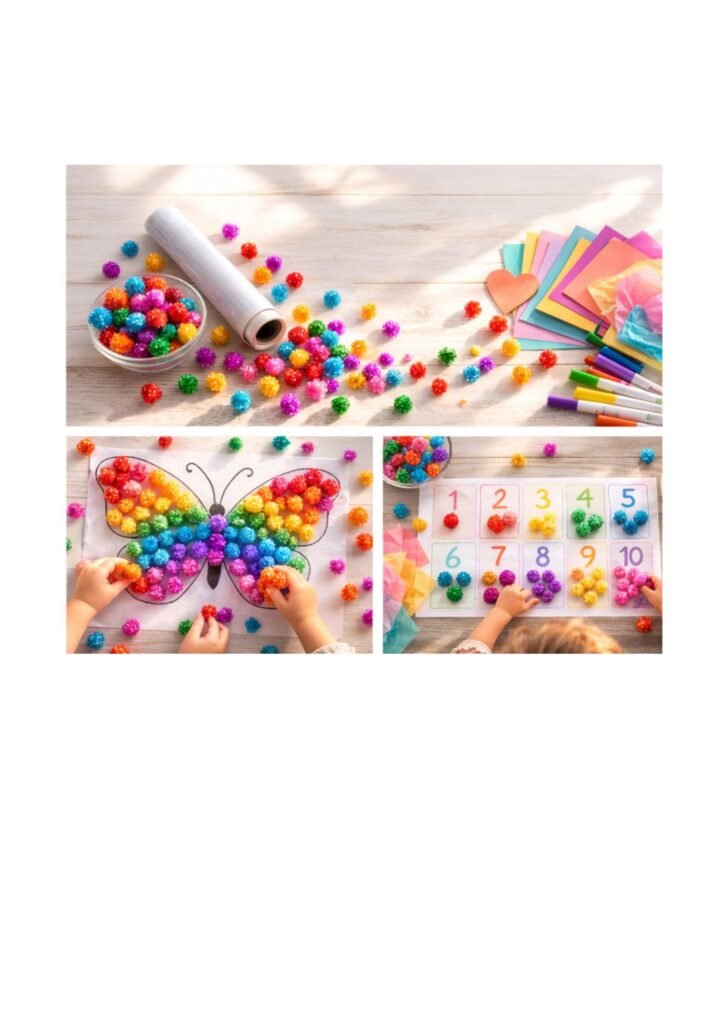
We’re talking about a roll of clear contact paper and a bag of glitter pom poms. Together, they cost under $10. And together, they’ve given me more uninterrupted coffee moments than I can count.
Below you’ll find 10 activities — the original 5 from our post, plus 5 brand new ones — all using just these two supplies. Every activity includes exactly what you need and step-by-step directions simple enough for your kids to follow along.
Shop the main supplies: Contact Paper | Glitter Pom Poms — affiliate links, thank you for your support!
Activity 1: Glitter Pom Pom Sticky Wall
Best for ages: 1–5 | Setup time: 2 minutes | Busy time: 30–60 minutes
This is the one that started it all. Stick contact paper to the wall, sticky side out, and watch your toddler go completely feral in the best way possible. The glitter pom poms catch the light, which makes this extra mesmerizing for little ones.
What You Need
• Glitter Pom Poms — mixed sizes and colors
Directions
1. Cut a large piece of contact paper — about 2 feet wide works great.
2. Peel the backing off and stick it to a low wall or sliding glass door, sticky side facing OUT toward your child.
3. Secure the edges with a tiny piece of tape if needed.
4. Pour out a pile of glitter pom poms within reach.
5. Show your child how to press a pom pom onto the sticky surface. That’s it — they’ll take it from there!
6. For older kids, call out colors and have them only press that color. Instant learning game.
Pro tip: Set this up near a window for natural light — the glitter sparkles like crazy and makes for the best photos.
Activity 2: Nature Sensory Board
Best for ages: 2–6 | Setup time: 5 minutes | Busy time: 30–45 minutes
This one gets the kids outside AND keeps them busy once you’re back in. They collect nature, then arrange it into their own sticky masterpiece. It’s secretly great for sensory development and fine motor skills.
What You Need
• Contact Paper (12-18 inches long)
• Glitter Pom Poms — mixed sizes and colors
• Nature items: leaves, flower petals, small sticks, grass, pebbles (free — from your yard!)
Directions
1. Head outside and let your child collect nature items — leaves, petals, sticks, anything interesting.
2. Come inside and cut a piece of contact paper. Peel the backing off and lay it flat on a table, sticky side up.
3. Tape the corners down so it doesn’t curl.
4. Let your child press their nature finds onto the sticky surface however they like.
5. Add pom poms in between for color and texture.
6. When done, press another piece of contact paper on top to seal it. You now have a nature collage to hang up!
Pro tip: Use this as a keepsake — date it and hang it in their room. Adorable every single time.
Activity 3: Window Suncatcher
Best for ages: 2–7 | Setup time: 5 minutes | Busy time: 20–40 minutes
This one looks like you tried really hard. You did not. Contact paper on a sunny window with colorful tissue paper shapes = the most satisfying ‘wow’ reaction from guests that costs basically nothing.
What You Need
• Glitter Pom Poms — mixed sizes and colors
• Scissors
Directions
1. Pre-cut shapes from tissue paper: stars, hearts, circles, whatever your child loves.
2. Cut a piece of contact paper and stick it to a sunny window, sticky side facing into the room.
3. Let your child press the tissue paper shapes onto the sticky surface.
4. Add glitter pom poms between the shapes for extra texture.
5. Step back and watch the light come through. Magic.
6. Peel off and reposition anytime — the contact paper sticks and resticks to windows easily.
Pro tip: This is your #1 photo opportunity. Morning light through a colorful window suncatcher is genuinely gorgeous.
Activity 4: Color Sorting Activity
Best for ages: 1.5–4 | Setup time: 3 minutes | Busy time: 20–30 minutes
One of the best early learning activities you can do at home, and all you need is a piece of paper and your pom pom bag. Great for toddlers who are starting to recognize colors.
What You Need
• Glitter Pom Poms — multi-color pack
• Markers in colors matching your pom poms
• Optional: Contact Paper to stick circles to table so they don’t slide
• Optional: a muffin tin as a fun 3D alternative to paper circles
Directions
1. Draw large circles on white paper in colors that match your pom poms — red, blue, yellow, green, etc.
2. If using contact paper: cut small squares and stick the paper circles to the table so they stay in place.
3. Pour out the pom poms into a pile.
4. Show your child how to put the red pom poms in the red circle, blue in blue, etc.
5. Cheer them on and count the pom poms in each circle together.
6. For older kids: add a timer challenge or sort by size AND color.
Pro tip: Use a muffin tin instead of paper circles for a 3D sorting version that’s easier for little hands.
Activity 5: Mess-Free Art Mat
Best for ages: 2–6 | Setup time: 2 minutes | Busy time: 30–45 minutes
All the creativity of arts and crafts, none of the glitter glue disaster. Kids arrange pom poms on a sticky contact paper mat into faces, patterns, animals — whatever their imagination creates. Rearrangeable, reusable, and totally mess-free.
What You Need
Directions
1. Cut a large piece of contact paper and tape it sticky-side up to the table.
2. Pour a bowl of assorted glitter pom poms nearby.
3. Challenge your child to make a face, an animal, a rainbow, or a pattern.
4. Pom poms can be pressed on and peeled off and rearranged as many times as they want.
5. Take a photo of their finished design before clearing it for the next one.
Pro tip: Call out a prompt to get them started: ‘Can you make a silly face?’ or ‘Make a pizza!’ — you’ll be amazed what they come up with.
Activity 6: Pom Pom Toss and Catch Board
Best for ages: 3–8 | Setup time: 5 minutes | Busy time: 30–60 minutes
This one combines gross motor movement with a sneaky reading or math challenge. Kids stand back and toss pom poms at a sticky target board. When one sticks, they complete the challenge in that zone. Great for siblings to play together.
What You Need
• Markers — multiple colors for zones
• Painter’s tape to hang board on wall and mark throwing line on floor
Directions
1. Cut a large square of contact paper. On the paper side (before peeling), draw zones using a marker — circles or sections labeled with numbers, letters, colors, or simple math facts.
2. Peel the backing and stick the contact paper to a low wall or door, sticky side out.
3. Mark a throwing line on the floor with tape — about 3–4 feet back.
4. Kids toss pom poms from behind the line at the board.
5. When a pom pom sticks to a zone, they call out the number, letter, or answer.
6. Keep score or just play for fun. Adjust the throwing distance for different ages.
Pro tip: Label zones with sight words for early readers, or simple addition problems for kindergartners. Learning disguised as a game.
Activity 7: Pom Pom Painting (No Paint!)
Best for ages: 2–6 | Setup time: 3 minutes | Busy time: 20–40 minutes
This looks like painting, works like painting, and has zero paint. Kids ‘paint’ by pressing and dragging pom poms across contact paper to create abstract art. Swap the pom poms for different textures for extra sensory exploration.
What You Need
• Markers
• Scissors to trim finished artwork
Directions
1. Draw a simple outline on white cardstock — a butterfly, a sun, a house, or let them freeform.
2. Cut a piece of contact paper the same size and lay it on top, sticky side up.
3. Let your child press glitter pom poms onto the sticky surface to ‘color in’ the picture underneath.
4. Mix sizes: big pom poms for large areas, small ones for detail.
5. When done, press another sheet of contact paper on top to seal and preserve the artwork.
6. Trim the edges and hang it up — it’s genuinely beautiful.
Pro tip: Print a simple coloring page from online and use that as the base outline. Dinosaurs, unicorns, and flowers all work amazingly.
Activity 8: Sensory Sticky Table
Best for ages: 1–3 | Setup time: 2 minutes | Busy time: 20–45 minutes
This is the ultimate baby and toddler activity. Zero choking hazard risk when you use large pom poms, maximum sensory input, and completely self-directed. You can sit with a coffee and just watch them explore.
What You Need
• Painter’s tape to secure to highchair tray or table
• Optional add-ins: fabric scraps, large buttons, felt shapes for extra texture
Directions
1. Tape a large piece of contact paper directly to the top of a low table or highchair tray, sticky side up.
2. Place a handful of large pom poms nearby.
3. Let your baby or toddler explore the sticky surface with their hands first.
4. Introduce the pom poms one at a time and show them how to press and pull.
5. Add fabric scraps, felt pieces, or other large safe textures for variety.
6. Replace the contact paper sheet when it gets too full or loses stickiness.
Safety note: Always supervise babies closely and use only large pom poms (2 inch or bigger) to eliminate any choking risk.
Activity 9: Pattern Making Mat
Best for ages: 3–7 | Setup time: 5 minutes | Busy time: 20–30 minutes
Pattern recognition is a foundational math skill, and this activity sneaks it in through play. You set up the start of a color or size pattern, then challenge your child to continue it. It sounds simple — but they’ll be obsessed.
What You Need
• Contact Paper (flat on table, sticky side up)
• Markers and White paper to write out pattern key (optional)
Directions
1. Tape contact paper sticky side up to the table.
2. Start a simple pattern with pom poms: red, blue, red, blue… and leave it unfinished.
3. Ask your child: ‘What comes next?’ Let them choose and press it on.
4. Once they get it, make it harder: red, red, blue, red, red, blue…
5. Challenge them to create their OWN pattern for you to continue.
6. Take a photo of completed patterns and see how long they can make them.
Pro tip: Mix size patterns too: big, small, big, small. The glitter pom pom sets usually come in multiple sizes which makes this even easier.
Activity 10: Pom Pom Counting Tower Mats
Best for ages: 2–6 | Setup time: 5 minutes | Busy time: 20–35 minutes
This is the one that teachers love. Draw numbered boxes, kids fill each box with the right number of pom poms. It’s hands-on counting practice that actually sticks because they’re physically placing and touching each one.
What You Need
• Markers
• Ruler (optional, for drawing neat grid lines)
• White paper as a base
Directions
1. On the paper side of contact paper, draw a grid of boxes — about 6 to 10 boxes.
2. Write a number in each box from 1 to 10 (or 1 to 5 for younger kids).
3. Peel the backing and stick the mat sticky side up on the table.
4. Show your child: ‘This box says 3 — can you put 3 pom poms in it?’
5. Let them work through each numbered box independently.
6. Count together when they’re done to check their work. Celebrate every one!
Pro tip: Write the number AND draw the same number of dots next to it for early learners who aren’t reading numbers yet.
Your Complete Supply List
That’s 10 activities from two main supplies plus a few easy extras. Here’s the full list of everything you might need across all 10 activities:
The Two Main Supplies (affiliate links — thank you for supporting us! )
Things You Probably Already Have at Home
• Painter’s tape — used in nearly every activity
• Scissors
• Markers in multiple colors
• Ruler (optional, for drawing neat grid lines)
• muffin tin (optional swap for color sorting activity)
Worth a Quick Check in Your House
• Colored tissue paper — for window suncatcher (check your gift wrap drawer)
• Washable markers — for pom pom painting outlines
• Felt shapes — optional sensory add-ins for baby sticky table
Free Outdoor Supplies
• Leaves, flower petals, small sticks, grass, pebbles — nature sensory board, totally free from your yard
Honestly? For most of these activities you only need the contact paper, the pom poms, and tape. Everything else is optional or already in your home.
Affiliate notice: This post contains affiliate links. If you purchase through our links, we may earn a small commission at no additional cost to you. Every purchase made through our links directly supports our small business and helps us continue creating free content and activity ideas for your family. We only share products we genuinely use and love. Thank you from the bottom of our hearts for reading, sharing, and supporting us!
Save this post. Share it with another parent who needs a break.
Drop your kid’s age in the comments and we’ll tell you which activity to